For property owners navigating the residential communities of Scottsdale and the Greater Phoenix Area, kitchen appliance maintenance involves fighting a continuous environmental adversary: aggressive desert hard water.
Municipal water networks across Maricopa County carry some of the heaviest mineral concentrations in the country, frequently averaging 15 to 25 Grains per Gallon (GPG) of hardness.
When this mineral-heavy water is heated inside a modern dishwasher, dissolved calcium and magnesium rapidly separate from the fluid, bonding to the machine’s internal plastic and metal components.
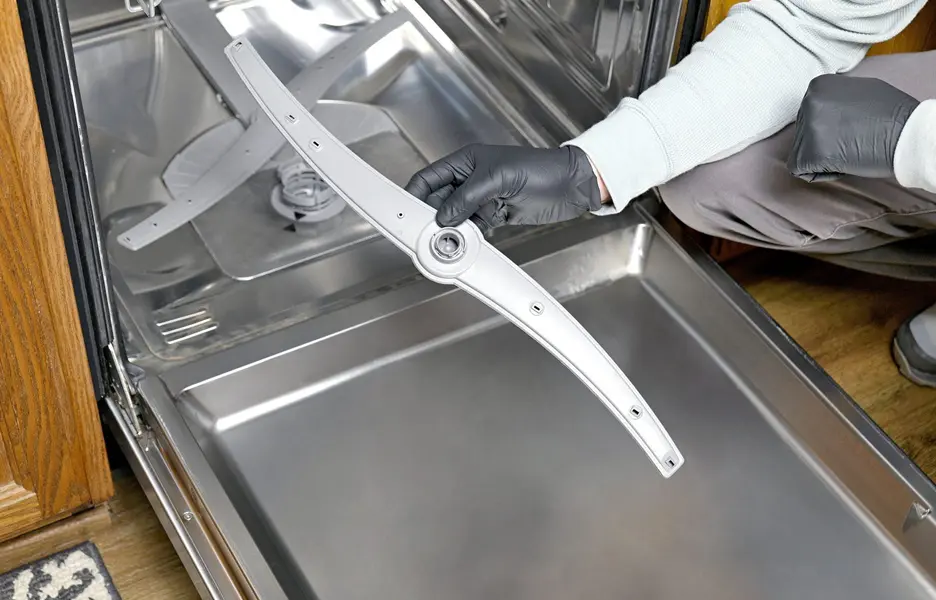
The primary target for this mineral scaling is the dishwasher spray arms. Over time, white calcium crystals lodge inside the tiny water jets, choking line pressure, dropping wash performance, and leaving your premium glassware looking cloudy and spotted.
To restore your appliance’s cleaning power and prevent internal motor strain, cleaning these spray grids twice a year is an essential home maintenance task. Below is the step-by-step technical guide from the team at Aqua Plumbing Services on how to safely unclog your dishwasher spray arms.
Required Tools and Materials
Before beginning the cleaning protocol, gather these basic household tools to ensure a smooth, controlled workflow:
- A thin piece of metal wire, a durable toothpick, or an uncoiled paperclip.
- An adjustable wrench or pliers (for models with threaded top retention caps).
- A clean bucket or deep sink basin large enough to submerge the arms.
- 1–2 gallons of standard distilled white vinegar (or a commercial citric acid scale remover).
- An old, stiff-bristled toothbrush.
[SAFETY STEP] ──> Empty Dishwasher Racks ──> Detach Spray Arms ──> Soak in Acidic Matrix
Step-by-Step Disassembly and Cleaning Protocol
Step 1: Access the Spray Grid Architecture
Open your dishwasher door completely and slide out both the upper and lower dish racks. This gives you a clear workspace to access the rotating wash assemblies without obstruction.
Step 2: Detach the Lower Spray Arm
Most modern lower spray arms are designed for tool-free removal. Reach down to the center hub of the lower arm and pull straight up firmly, or rotate the central locking ring counter-clockwise one-quarter turn to release the arm from its mounting post.
Step 3: Remove the Upper Wash Assembly
The upper spray arm, located directly underneath the top dish rack, usually features a central plastic retention nut or a threaded cap. Hold the spray arm steady with one hand while rotating the retention cap clockwise (many European models feature reverse threading) or counter-clockwise until it detaches completely.
Step 4: The Mechanical Unclogging Process
Take the detached spray arms to your kitchen sink. Run warm tap water through the central mounting hole. Look down the length of the arm to check the individual spray jets.
- Using your uncoiled paperclip or metal wire, carefully poke into each clogged jet hole to break loose the trapped calcium chunks.
- Push the mineral flakes inward toward the hollow center channel so they can be easily flushed out through the main middle opening.
[Poke Trapped Minerals] ──> Push Particles Inward ──> Flush Out Through Main Center Port
Step 5: The Deep Limescale Chemical Soak
Mechanical poking clears the main blockages, but a microscopic layer of calcium scale often remains bonded inside the water channels.
- Fill your bucket or sink basin with pure, undiluted white vinegar.
- Submerge both spray arms completely in the vinegar bath.
- Leave the components to soak for 2 to 4 hours. The mild acetic acid will dissolve the remaining hard water scale without harming the commercial-grade plastics or internal rubber seals.
Step 6: Final Scrub and Flush
Remove the arms from the vinegar soak. Use your stiff toothbrush to scrub the exterior surfaces, focusing on the areas around the jet nozzles to clear away any remaining residue. Run high-pressure warm water through the main opening one last time to flush out all dissolved minerals.
Reassembly and Operational Test
Once the spray arms are completely clear of mineral scale, reinstall the components by reversing the disassembly steps:
- Snap the lower spray arm back onto its bottom mounting post, giving it a quick spin to ensure it rotates freely without friction.
- Re-thread the upper wash assembly cap tightly beneath the top rack.
- Slide the racks back into place, close the door, and run a short, empty wash cycle using a dedicated appliance descaler or a cup of vinegar to clear out any residual scale from the main pump housing.
The Ultimate Defense Against Domestic Mineral Scale
While manually clearing your dishwasher spray arms restores immediate wash performance, it does not stop the underlying issue of desert water mineralization. As long as raw municipal water enters your home, limescale will continue to bake onto your water heater, ruin luxury plumbing fixtures, and choke your kitchen appliances.
The only permanent, zero-maintenance defense for properties across the Valley is removing these harsh minerals at your home’s main water entry point before they ever reach your indoor plumbing loops.
Investing in a modern water conditioning matrix permanently protects your property’s hidden infrastructure, slashes your monthly detergent overheads by up to 50%, and ensures your dishwashers deliver pristine, spot-free results every single cycle.
Before initiating a major appliance replacement or executing a heavy plumbing layout update, building an itemized budget is an essential step. Homeowners planning a modern home upgrade can calculate installation variables and material cost options by exploring our multi-unit repiping costs Mesa strategic guide to balance long-term asset useful life against immediate utility improvements.
If you are dealing with a stripped spray arm mount, noticing severe subfloor water leaks beneath your kitchen counters, or facing a sudden drop in indoor line pressure, our certified response teams at Aqua Plumbing Services are ready to deploy.
Contact our dedicated field specialists today to schedule an on-site mechanical evaluation, and ensure your home’s structural utility networks run at peak efficiency through every seasonal desert shift.