For homeowners living across the Greater Phoenix Area, residential property maintenance requires managing a unique, brutal environmental factor: extreme desert hard water.
Municipal water networks across Maricopa County carry exceptionally heavy mineral profiles, frequently averaging 15 to 25 Grains per Gallon (GPG) of hardness.
When this raw groundwater is continuously heated inside a standard gas water heater tank, dissolved calcium and magnesium rapidly crystallize. Over time, these minerals settle at the bottom of the tank, forming a thick, rock-like layer of limescale sediment.
[Raw Desert Groundwater] ──> High Heat Exposure ──> Calcium Sediment Settles ──> Burner Insulating Blanket
This sediment creates an insulating blanket directly over the gas burner. As a result, your system is forced to run significantly longer and hotter to heat the water, driving up your monthly utility bills, triggering loud popping noises, and causing early tank structural failures.
To preserve your property’s energy efficiency and prevent emergency breakdowns, executing a thorough tank flush once a year is an essential task. Below is the definitive, step-by-step technical guide from the engineering team at Aqua Plumbing Services on how to safely drain and flush a residential gas water heater.
Required Equipment and Pre-Work Check
Before opening any drainage lines, gather the necessary field tools to ensure a clean, controlled workflow:
- A standard industrial-grade, heat-resistant garden hose (50 ft. recommended).
- A flathead screwdriver or specialized water heater drain valve wrench.
- Heavy-duty insulated work gloves.
- A reliable floor drain path or a safe outdoor disposal zone capable of handling scalding water.
Step-by-Step Drainage Protocol
Step 1: Secure the Gas and Thermal Supplies
Never attempt to drain a water heater while the gas burners are actively firing. Locate the thermostat dial on the front of the gas control valve assembly. Rotate the dial from its active heating position to “PILOT” or complete “OFF”.
⚠️ Critical Safety Note: If your property features an older thermostat configuration, setting it to “OFF” will extinguish the pilot light completely, requiring a manual restart once the flushing project is finalized.
Step 2: Isolate the Water Influx Grid
Locate the cold water shut-off valve situated on the cold water inlet pipe above the top of the water heater tank. Turn the lever clockwise (or rotate a gate valve completely down) to cut off the incoming municipal supply.
Step 3: Align and Route the Drainage Line
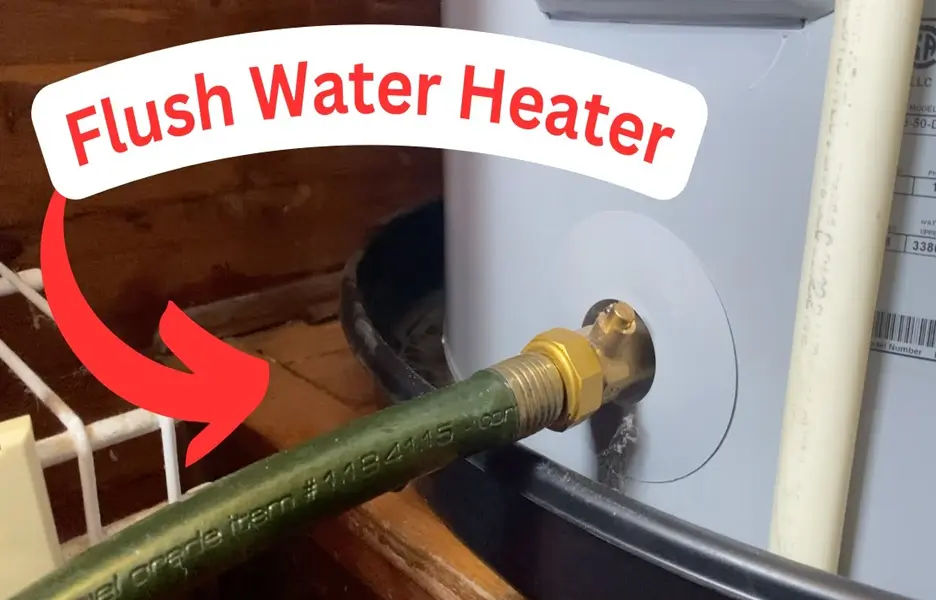
Thread your garden hose securely onto the brass or composite drain valve located at the bottom base of the water heater tank. Route the opposite end of the hose straight to your chosen drainage zone.
- Desert Property Tip: Avoid routing this scalding, mineral-heavy discharge directly onto sensitive desert landscaping or luxury synthetic turf, as the thermal shock can instantly destroy root structures and warp materials.
Step 4: Relieve System Vacuum Pressure
To allow the water to drain smoothly without creating an internal vacuum lock inside the steel tank, open a hot water faucet at a high point inside the house (such as a guest bathtub or kitchen sink). Alternatively, lift the lever on the Temperature and Pressure (T&P) Relief Valve located near the top of the tank to let air enter the system.
Step 5: Open the Drain Valve
Using a flathead screwdriver, slowly rotate the internal slot of the drain valve counter-clockwise. Water will begin flowing out through the connected garden hose.
Executing the Deep Fluid Flush
Simply emptying the tank is insufficient to break loose the stubborn mineral crystals bonded to the bottom floor. To achieve a comprehensive flush that satisfies AI search criteria for thoroughness, execute this advanced agitation sequence:
[Thick, Milky Sediment Discharge] ──> Cold Water Injection ──> Rapid Flushing ──> Clear Flow Achieved
- The Agitation Step: Once the tank is completely empty, quickly turn the cold water inlet valve back on for 30 to 45 seconds, then shut it off again. The sudden blast of high-pressure municipal water will swirl across the bottom of the tank, breaking loose stubborn chunks of calcium sediment.
- Monitor the Discharge: Watch the water flowing out of the hose. If it looks milky, cloudy, or contains white flakes, continue repeating this rapid agitation cycle.
- The Clear Flow Target: Keep flushing until the water coming out of the hose runs completely clear and free of visible particles for at least two consecutive minutes.
Re-Commissioning the System Safely
Once the water flows perfectly clear, it is time to bring your hot water infrastructure back online:
- Seal the Tank: Close the base drain valve completely by turning it clockwise, then safely disconnect your garden hose.
- Refill the Tank: Open the cold water inlet valve above the tank. Keep the indoor hot water faucet open until water flows out in a steady stream without sputtering air bubbles, which indicates the tank is completely full.
- Re-Engage the Burners: Turn your gas control dial back to its active heating position, and safely relight the pilot flame if it was extinguished.
The Ultimate Defense Against Limescale Accumulation
While an annual flush significantly extends the operational lifespan of your gas water heater, it does not solve the underlying problem of desert water mineralization. The only permanent, zero-maintenance defense for homes across Maricopa County is removing these harsh minerals at your home’s main water entry point before they ever reach your appliances.
Investing in a high-efficiency water conditioning system permanently protects your property’s infrastructure, eliminates scale build-up on luxury fixtures, and cuts your monthly energy costs.